We may earn money from the products available on this page and/or participate in affiliate programs.
When we ask renovators what inspires them, they often mention Instagram posts they've saved or cool hotels they've visited. But Leah Hodson's bathroom remodel started much closer to home.Well, to be exact, it started with her. old House.
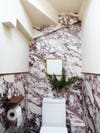
When the UK-based DIY enthusiast from @thestanleydiary moved out in December, she was especially sad to leave behind her “perfect bathroom”, which was covered almost entirely in marble tiles. The perfect place to recreate the look in her new home was Powder's Bathroom. It was a blank canvas, albeit with lots of weird ceiling and wall irregularities.
The only difference this time was that Hodson didn't want to use real marble. “I'm not ready to start tiling yet because I have two toddlers running around me,” she says. Hodson also wasn't interested in spending thousands of dollars upgrading her bathroom, so instead of strolling through her stone garden, she Googled Calacatta for her Viola marble-inspired mural wallpaper. I realized that it was. It turns out that Belarte Studio has the most viable option. “Anyone who actually sees this can't believe it's wallpaper,” Hodson says.
supplies
Step 1: Find the starting line
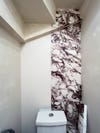
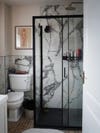
Hodson's mural wallpaper is very bold, and since the restroom is so small, she felt that filling every inch with terracotta designs would make the space feel smaller. So she decided as a compromise that she would cover half the walls with three and the full wall with only one. The wall behind the toilet was completely treated, so she decided to start there. First, she drew a line down the center of the wall. This will tell you where to line up her two seams of separate wallpaper panels. (Over time, wallpaper can shift and reveal gaps between sections. If that gap is in the center of the room, it's actually less noticeable than if it's off-center.)
Step 2: Paste and Paste
Peel-and-stick processes are popular among DIY enthusiasts, but the design Hodson is obsessed with requires coating the walls first. She used a paint roller to dip the paste into the tray and roll the adhesive onto the wall. “I find that she gets more even coverage than the brushes I've been using,” she says.
Step 3: Patiently avoid bumpouts
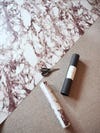
The difficulty came when matching the full wall panels to the half wall panels. This is where a sharp utility knife and the time-tested rule of “measure twice, he cuts once” come into play. Mr. Hodson made sure to line up the sheets of pipe perfectly on his box so that the veins of the artificial stone all looked like he was one piece.
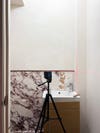
The area around her dressing table was the area that gave her the most headaches. Hodson accidentally cut the wallpaper too short and had to cut a small piece to hide the gap. “It took me a lot longer to fix it than I expected, but I'm glad I did because it's almost invisible,” she says.
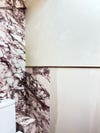
Step 4: Give yourself seamless boundaries
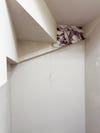
For surfaces only partially covered by wallpaper, Hodson installed wood molding around the top edge and first used a laser level to ensure the border was straight. Then she applied wallpaper from the top of the baseboard to the bottom of the wooden formwork. Trim pieces give the eye a natural endpoint.
Step 5: Protect the splash zone
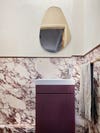
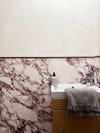
Even after refreshing the tired-looking vanity with a no-demo hack using pre-cut grooved MDF and liquid nails, Hodson still had a problem. It is to prevent the wallpaper behind the sink from being damaged by moisture.
Cue cut my. She picked up her 6 mm acrylic sheet from the brand (it arrived pre-cut) and We created a backsplash (pre-drilled) and installed brass screw caps to cover the drilled holes. The invisible barrier allows artificial stones to still shine.